
Specifications
Packet refresh rate: 50Hz/100Hz Full/150Hz/250Hz/333Hz Full/500Hz/D250/D500/F500/F1000
RF output power: 25mW/50mW/100mW/250mW/500mW/1W
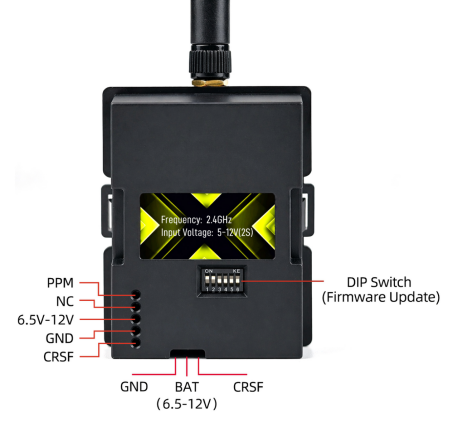
Frequency band: 2.4GHz ISM
Input voltage: 5-12V(2S)
USB Port: Type-C
Operating Current: <910 mA (7.5 V power supply, 1W output power)
Weight: 40g
Antenna: 2.4G rod antenna
Compatible transmitter: compatible with radio transmitter which has the Micro (JR, SLIM) module bay
Basic Configuration
2.4G ELRS Micro module supports the Crossfire serial protocol (CRSF protocol), so please make sure your transmitter support the CRSF serial protocol.
Note:
Please assemble the antenna before power on. Otherwise, the PA chip in the Micro module will be damaged permanently.
Please DO NOT use 3S or above battery to power up the Micro module via XT30 port. Otherwise, the power supply chip in the module will be damaged permanently.
CRSF Protocol
In this part, we use the transmitter with OpenTX system and RadioLink T16D/T12D to show how to setup the CRSF protocol and LUA script.
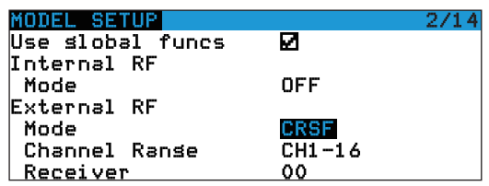
In OpenTX system, enter into MODEL SELECTION--MODEL SETUP. Turn off the "Internal RF". E enable "External RF" and select "CRSF" as the protocol, as shown below:
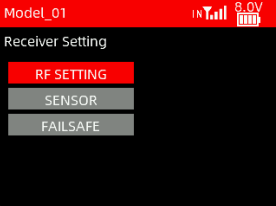
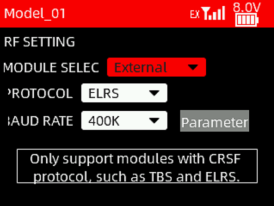
When T16D/T12D transmitter is used, mount the module on T16D/T12D. Enter Receiver Setting -> RF Protocol. Set the module to External, and select the corresponding protocol and baud rate, as shown below:

Here is the tutorial to show how to connect ATA ELRS module to T16D:
https://www.youtube.com/watch?v=64idhfqYJLA
LUA Script
If you want to modify the parameters such as power, refresh rate etc, the LUA script can be used to control the module.
The steps to modify the LUA script for OpenTX:
• Save the ELRS.lua script files onto the radio transmitter's SD Card in the Scripts/Tools folder;
• Long press the "SYS" button (for RadioMaster T16 or similar radios) or the "Menu" button (for Frsky Taranis X9D or similar radios) to access the SD-HC CARD Menu where you can find ELRS script ready to run;
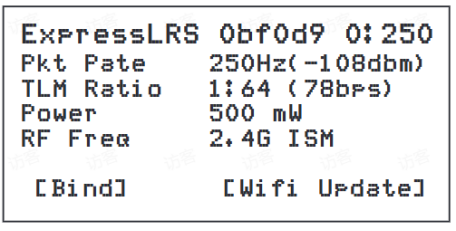
• Below image show the LUA script runs successfully:
The steps to modify the LUA script for RadioLink T16D transmitter:
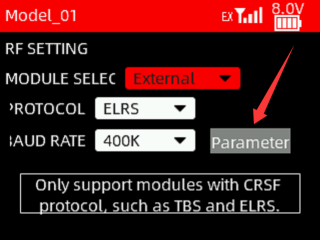
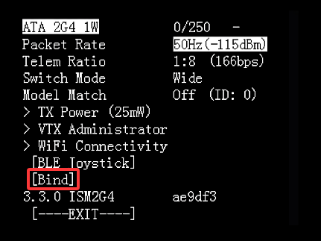
Enter Receiver Setting -> RF Protocol. Set the module to External. Click Parameter to enter the script, as shown below:
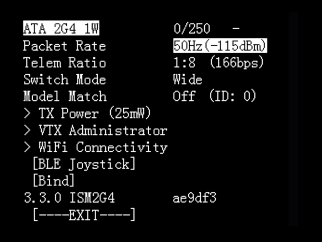
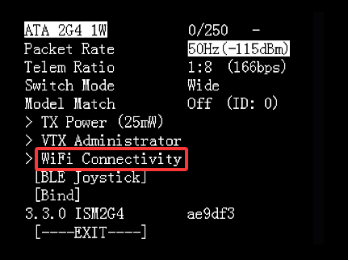
With the LUA script, pilot could check and setup some configurations of the module. Here is the introduction of these parameters:
Packet Rate: Data packet frequency. The higher the frequency, the shorter the interval between data packets sent by the module, and the faster the receiver response
Telem Ratio: Receiver telemetry ratio
Switch Mode: Switching mode
Model Match: Model matching, off by default
TX Power: RF TX module output power
VTX Administrator: Set the VTX parameter of FC and goggles which have bound with RF TX module
WiFi Connectivity: Enables Wi-Fi function of RF TX module or receiver
BLE Joystick: Open the bluetooth function
Bind: Set the RF TX module into binding status
Exit: Return or exit
Bind
Power on ELRS receiver three times consecutively, with a power-up interval of less than 1.5 seconds.
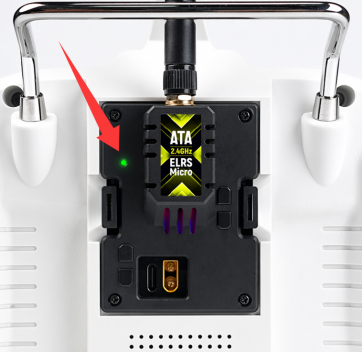
The indicator light of the receiver will flash twice, indicating it has entered the binding status.
Select the BIND on the transmitter, as shown below.
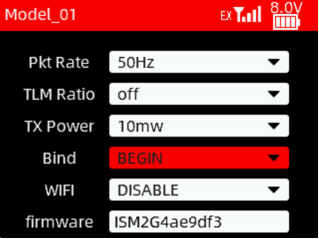
Set Bind to BEGIN on T12DSelect Bind on T16D
The indicator light of the receiver will turn solid, indicating successful binding.
After successful binding, the program will record the paired remote control device. The next power-on will restore the last binding record. No need to bind them every time the receiver is powered on.
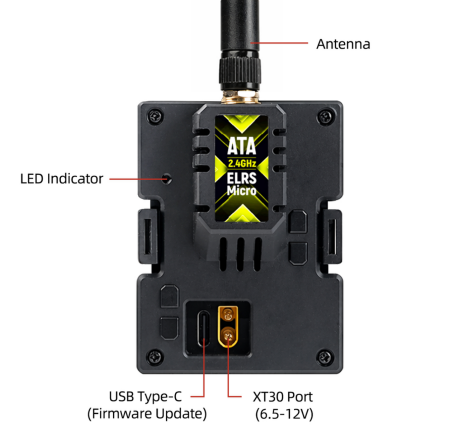
LED Indicator
2.4G ELRS Micro module comes with a LED indicator, as shown below:
Here is the introduction of the LED indicator:
LED indicator status | Introduction |
Rainbow fade effect | Starting up |
Green heartbeat | Web update mode enabled |
Blue heartbeat | Bluetooth joystick enabled |
Red flashing 100ms on/off | Radio chip not detected |
One Orange flash every second | No handset connection |
Solid single color | Connected to receiver, color indicates packet rate |
Fading single color | No connection to receiver, color indicates packet rate |
No Light | Off or in Bootloader Mode |
Firmware Update
2.4G ELRS Micro module has two firmware versions: TX firmware and backpack firmware. The TX firmware focuses on RF communication, handling communication with the receiver, processing joystick signals, and performing frequency hopping, while the backpack firmware is primarily used for local wireless communication with other devices such as goggle video receivers, to sync settings, binding phrases, or handle head tracking. In general, Users only need to update the TX firmware. The update of the backpack firmware is only needed after the hardware of the module has been updated, and the backpack firmware can only be upgraded via USB connection.
Here is the download link of the firmware for the module:
https://radiolink.com.cn/elrs1wMicro_firmwares
2.4G ELRS Micro module supports two connection methods to update the firmware, including Wi-Fi connection and USB connection. Here is the introduction of the two connection methods:
Method 1: Wi-Fi connection (Only for TX firmware update)
Supply power to the ELRS module and wait one minute. Once the LED indicator of the module flashes bright green, you can find a Wi-Fi network named ExpressLRX TX on the computer or mobile phone that can connect to Wi-Fi. Select to connect to this Wi-Fi network and enter the password expresslrs to connect successfully;

Note: If the module is powered by RadioLink T16D/T12D transmitter, please enable the Wi-Fi mode on the transmitter, so the LED indicator of the module will flash bright green. For example, you need to set the Wi-Fi mode to ENABLE on RadioLink T12D transmitter, and click Wi-Fi Connectivity--Enable Wi-Fi on RadioLink T16D transmitter.
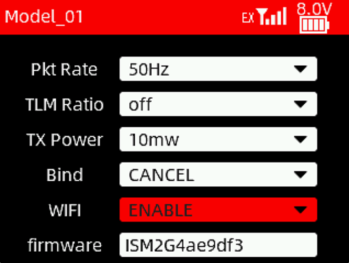
Set WIFI to ENABLE on T12D

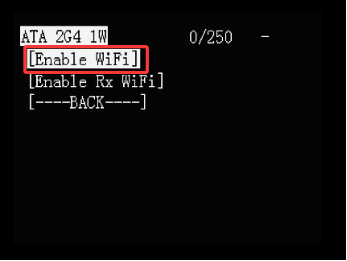
Select WiFi Connectivity--Enable Wi-Fi on T16D
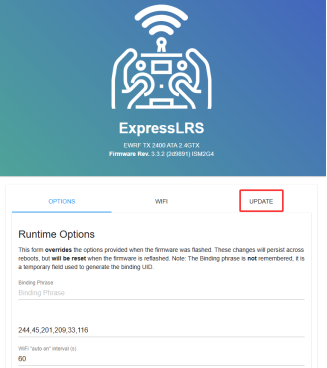
After successfully connecting, open the browser. Enter 10.0.0.1 in the search box at the top of the browser to enter the settings page of the module, and click UPDATE on the right;
Click "Select File", locate the directory where the latest firmware is stored and select the firmware, then click UPDATE on the right to upgrade the firmware;
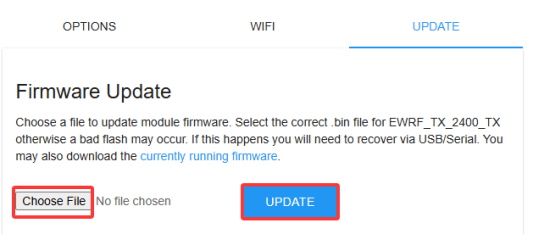
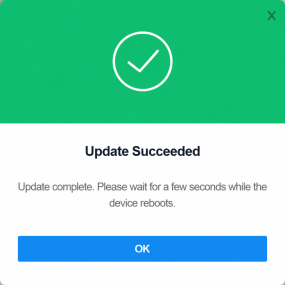
After a successful upgrade, you will see "Update Succeeded". If you see "Update Error" or "Update Failed", it means there is a firmware error or an unstable Wi-Fi signal. Please follow the steps above to re-flash the firmware.
Method 2: USB connection (For TX firmware and backpack firmware update)
Please install the USB driver on your computer. The driver can be downloaded from RadioLink official website: https://radiolink.com.cn/elrs1wMicro_firmwares
Prepare the Flash download tool. Open the website www.espressif.com.cn, click Support -> Download -> Tools ;

Locate the Flash download tool and click the download icon on the right ;
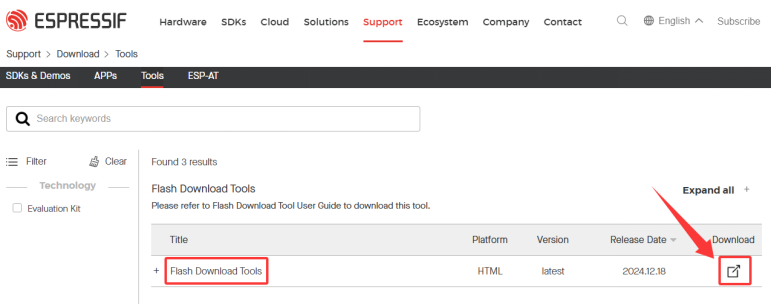
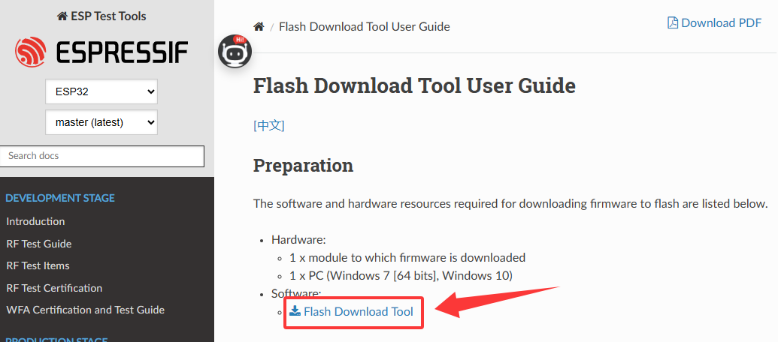
Click on the blue text "Flash Download Tool" to download it;
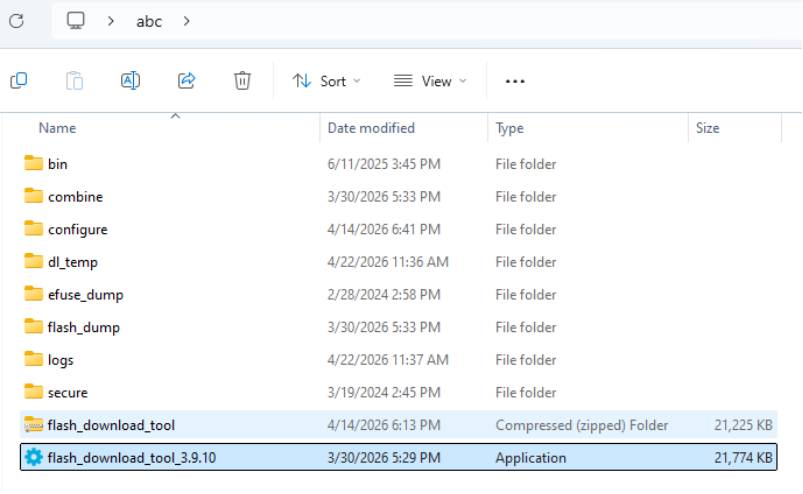
After the download is complete, you will see a compressed file named flash_download_tool.zip. Create a folder with any English name on your desktop and extract all the files from the compressed file into that folder. We need the flash_download_tool_3.9.10.exe program from that folder in the following firmware upgrade steps.
Set DIP switch
Before upgrading, you need to correctly configure the DIP switches. The method for configuring the DIP switches is as follows:
Function | DIP switch setting | |||||
1 | 2 | 3 | 4 | 5 | 6 | |
TX firmware update | ON | ON | OFF | OFF | OFF | OFF |
Backpack firmware update | OFF | OFF | ON | ON | OFF | OFF |
Interconnection of TX and backpack firmware | OFF | OFF | OFF | OFF | ON | ON |
For example: If you need to upgrade the TX firmware, please push DIP switches 1 and 2 to the top ON position and the other switches to the bottom OFF position; if you need to upgrade the backpack firmware, please push DIP switches 3 and 4 to the top ON position and the other switches to the bottom OFF position.
Update the firmware (take TX firmware as an example)
After opening the flash_download_tool_3.9.10.exe program, the pop-up window shown below will appear. Select ESP32 and Develop as shown in the image .
(Note: If you are upgrading the backpack firmware, you need to set Chip Type to ESP8266 .)
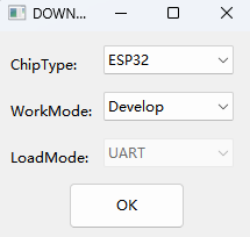
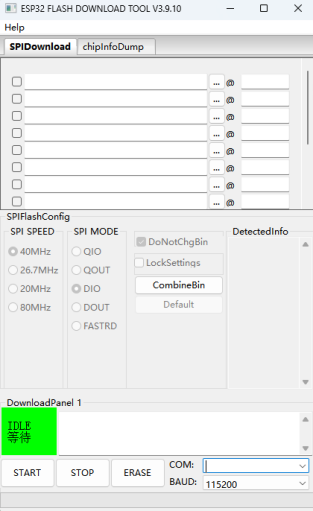
Click OK, and the following interface will pop up:
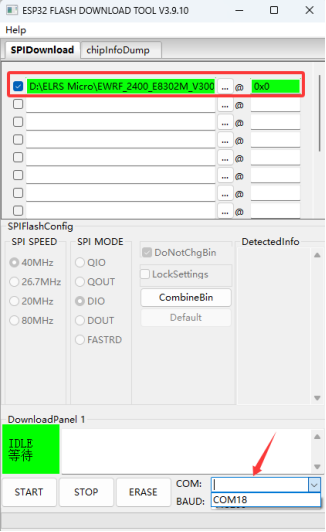
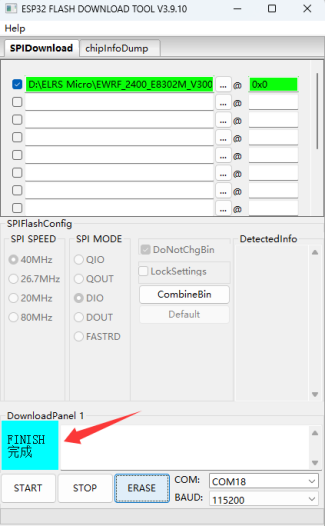
Connect the module to the computer with a Type-C cable. Select the COM port of the module in the lower right corner, and keep the baud rate at its default value. Click the three dots option at the top to select the firmware to be upgraded, then check the small square in front of the firmware, and enter 0x0 after the @ symbol.
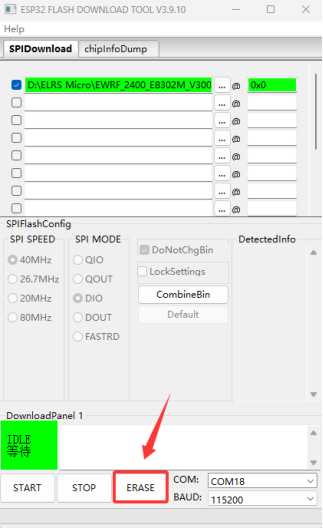
Click ERASE, and after half a minute, the green IDLE will turn into the blue FINISH ;
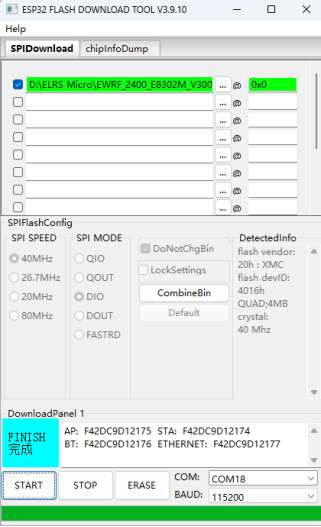
Click START , and the progress bar below will start moving forward . When the download box shows the information about the module, the upgrade is in progress normally. When the progress bar is complete, it will show FINISH.

After the firmware is upgraded, please power off the module and restart it.
Technical Support Here


Contact RadioLink RL User Manual FAQ Tutorials
via Fcebook Messenger
If the above communication cannot solve your problem, you can also send emails to our technical support: after_service@radiolink.com.cnThis content is subject to change. Please download the latest version from https://radiolink.com.cn/elrs1wMicro_firmwares